Welcome to Part 9 of #NewBloggers 101, and with this we start a new #NewBloggers content series: on social medias! Me and quite a few of other book bloggers have worked really hard to bring you a collection of posts, detailing all sorts of bookish social media you could be participating in. Now, don’t consider it as a must – it’s no good to have 15 social medias and not manage a single one right! Who has that kind of time anyway? No, think of this series more of an expansion of your horizons – it will show you what these social medias are best used for, and if you’re not using them yet – you can decide if it’s something you want to do.
So this time, we have two lovely bloggers to start off our series with a post on Goodreads! Welcome Jen @ Star-crossed Book Blog and Ivy @ Ivyclad Ideas! Get ready for a long post, everyone – this is going to be FROM THE TOP info about Goodreads. And before we dive into the intricacies of social media, here are the older #NewBloggers 101 posts if you need to catch up:
Expand List
- 27.07. The Greatest Book Blogging Myths I’ve Encountered (#NewBloggers 101, Book blogging, Discussion)
- 25.05. #NewBloggers 101 comes back! Litsy – A Bookish Social Network (#NewBloggers 101, Book blogging, Discussion)
- 04.05. [NewBloggers] What Tools Can Help Me Be An Organized Blogger? TBR Spreadsheets (#NewBloggers 101, Book blogging, Discussion)
- 30.03. [#NewBloggers 101] General Intro To Bookstagram (#NewBloggers 101, Book blogging, Discussion)
- 23.03. [NewBloggers] A (Mostly?) Complete Goodreads Tutorial Social Medias A Book Blogger Should Know: Part 1 #NewBloggers 101 (#NewBloggers 101, Book blogging, Discussion)
- 09.03. Bookstagram Myth: Props Are Expensive? Pamela @ Reverie Society Educates! (#NewBloggers 101, Book blogging, Discussion)
- 02.03. What Are Linkups All About? Nicole @ FYFA To The Rescue! (#NewBloggers 101, Book blogging, Discussion)
- 23.02. So you want to move from Blogger to (free) WordPress? (#NewBloggers 101, Book blogging, Discussion)
- 16.02. What Tools Can Help Me Be An Organized Blogger? Social Media And Networking (#NewBloggers 101, Book blogging, Discussion)
- 09.02. What Tools Can Help Me Be An Organized Blogger? Writing And Scheduling Posts (#NewBloggers 101, Book blogging, Discussion)
- 02.02. What Tools Can Help Me Be An Organized Blogger? Blogging Calendars (#NewBloggers 101, Book blogging, Discussion)
- 10.01. How Do I Make A Good Edelweiss Or NetGalley Profile? (#NewBloggers 101, Book blogging, Discussion, Edelweiss, NetGalley)
- 05.01. When Should I Start Requesting ARCs? (#NewBloggers 101, Book blogging, Discussion, Edelweiss, NetGalley)
So first of all, if you want to have a nice Goodreads experience, it’s advisable to clean up your profile. This is where we’ll start!
Jen’s advice on Goodreads profiles
Your profile is everyone’s first peak into who you are. This is where you get to gush about your interests, favorite books and talk a little bit more about yourself. So here’s a look at my profile, before I start talking about each section, so you know what I’m going to be talking about:
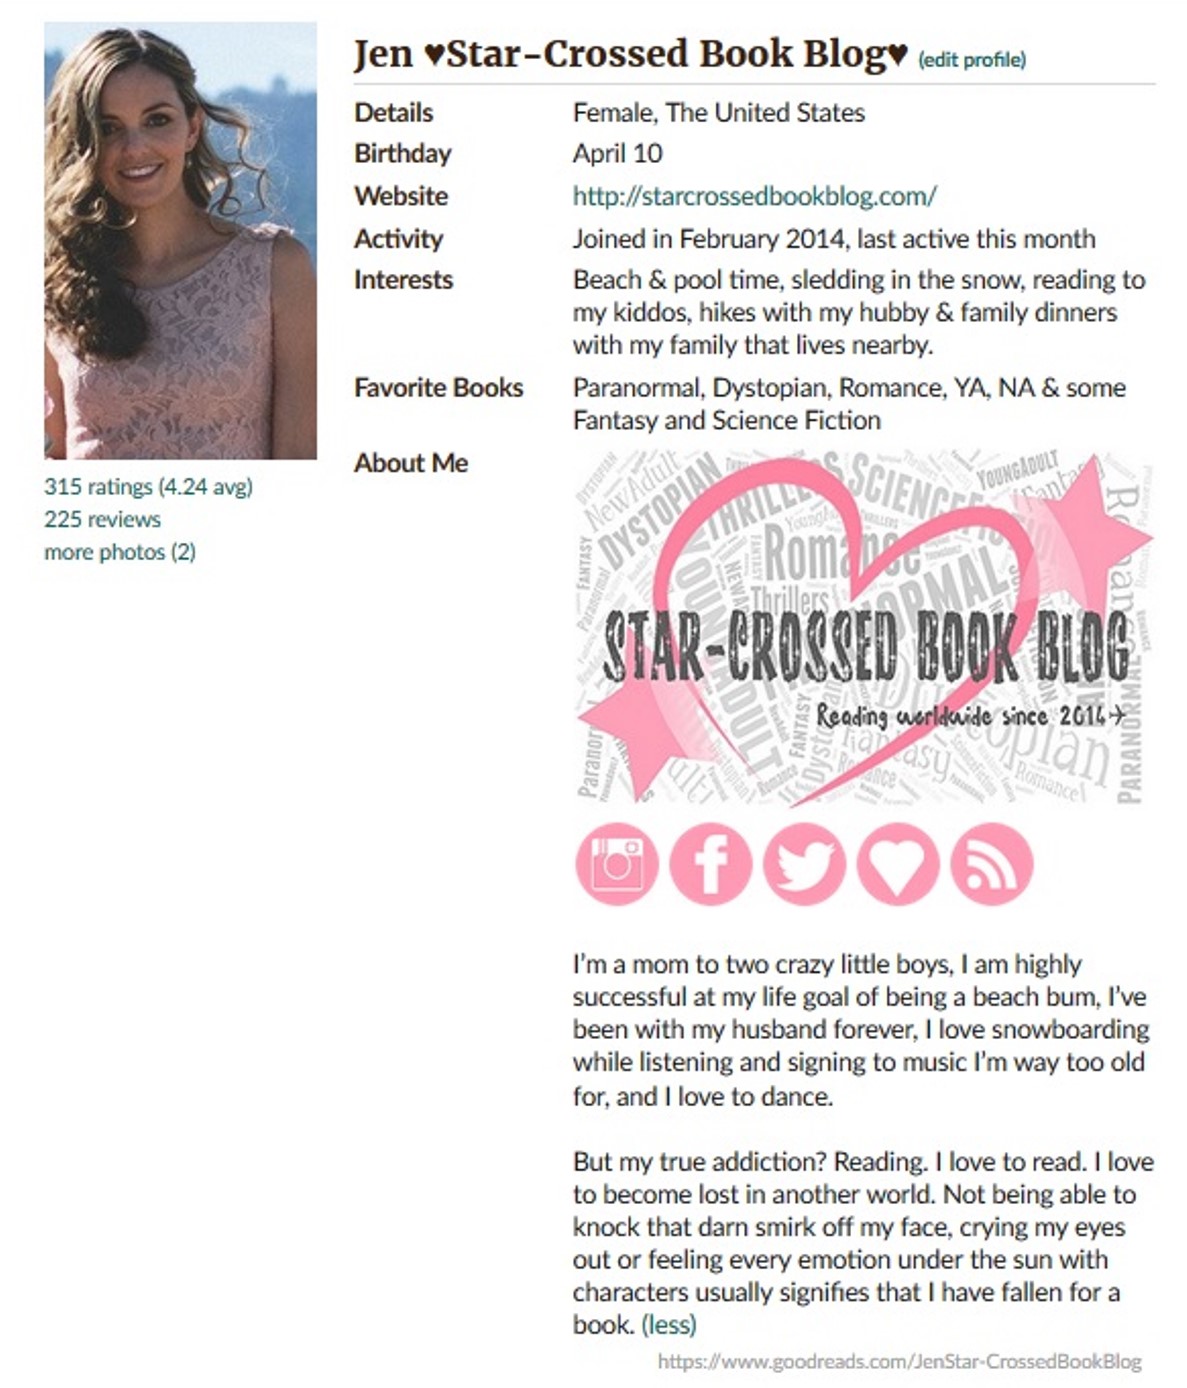
Name – Personally I don’t put my last name in a lot of public places. But if that’s your thing, then go right ahead. Instead, I just have my first name and then my blog name afterwards in hopes that people will associate me along with our blog.
User Name – You can make this whatever you want. All I did was just copy and paste my first name & blog name into that section.
Website – This is the website where you’d love to interact with bookish friends outside of Goodreads. So put your blog, Bookstagram, Twitter or whatever your favorite site is to interact with bookish people besides Goodreads.
Interests – What are your favorite things in the world? I put all my favorite stuff in there, besides reading. There’s a 200 character limit, and the struggle is real for getting all of your favorite stuff in there lol!
Favorite Books – I listed genres instead, since I could write pages about ALL the books I love. But if you aren’t a book whore like me, then go ahead and list your faves away!
About Me – This is the section that you can gush all you want… from your favorite books, book boyfriends, how you rate books to anything and everything! Also, since there’s only one place to link to a website, and I personally like to visit with bookish friends in more than one place, this is where I put our other website locations. If you click each picture, then you’re taken to either my blog, Instagram, facebook, twitter, etc. If you don’t know how to do that, you can create an account at imgur, upload the pictures you want to use, then go back to Goodreads and use these codes:
<a href=”web address to the site you want them to visit“><img src=”the .png link to the picture you uploaded to imgur”></a>
Let Evelina interject here that people sometimes put their NetGalley or other badges in this part of the profile as well. You’d still be using the same code, only replacing the location of your images and links. Alternatively, if you don’t want to do this, you could use a LinkTree link to put that in your website slot.
One more thing that can affect how your profile looks is your favorite authors! Did you know you could display your favorite authors on your profile?
Ivy explains how to add your favorite authors
Your favourite authors can be displayed on your profile. To add a favourite author, go to the page of the author in question. You see the button beneath their profile picture? The one that says ‘Follow Author’? There’s an arrow beside it. Click that to bring up a drop-down menu. The fourth option on the list is ‘Add to my Favourite Authors’. Click on that and, ta-da, you have successfully added a favourite author. You can also click the ‘Follow Author’ button to follow them. This is exactly like following any other member.
Now then, if your profile is nice and clean, it’s time to proceed to the main part of Goodreads and the reason why we’re there at all – Bookshelves! Things we will be talking about will include: Editing Your Bookshelves – Adding Shelves, Making Exclusive Shelves, Making Sortable Shelves, Making Sticky Shelves, Getting Recs Based on Shelves, Setting a Feature Shelf.
Ivy instructs us about Goodreads bookshelves
Before you can rate or review a book, you first have to add it to one of your shelves. Specifically, you have to add it to one of your exclusive shelves, because adding it to any other shelf will automatically mark it as ‘Read’ and that might not be correct.
So what’s an exclusive shelf? Well, let’s go into our bookshelves. The simplest way to get there is by clicking on ‘My Books’ in the navigation bar.
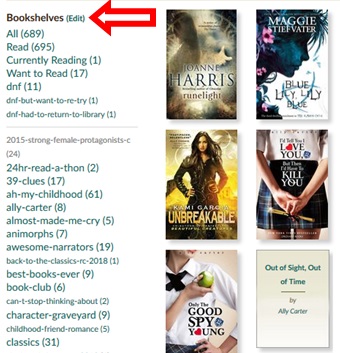
On the left, there should be a list of your shelves. Do you see the grey line? That separates your exclusive shelves from your normal ones. Everyone starts with the top three: Read, Currently Reading, and Want to Read. A book can only be on one of these shelves at once. So how do you make a new one?
First of all, you need to add a new shelf. Whilst there are several ways you could go about this, we’re going to do it via the page that allows you to edit your entire bookshelf. Click the ‘Edit’ button indicated on the above picture by the red arrow. Here’s the page that pops up:
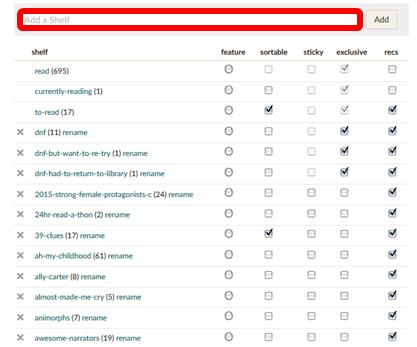
You should type your new shelf name in the box outlined in red. It can be a maximum of 35 characters. A shelf name can be anything! Maybe you want one for vampire fiction, or witches, or books where the princess saves herself. Whatever. Your online bookshelf is 100% customisable. But we’re making an exclusive shelf right now, so it should really be to do with the status of a novel. After all, you might want to shelf that vampire book under love triangles and YA fiction too. Common exclusive shelves that people add include DNF (Did Not Finish), Never Reading Ever (and variations of), and Wishlist. Which is apparently different to Want to Read.
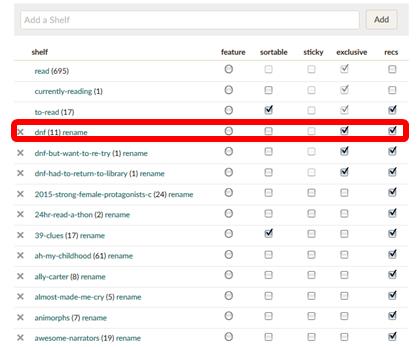
All you have to do to make your new shelf exclusive is to find it (non-exclusive shelves are listed alphabetically so this should be a quick job), run your mouse along the columns beside it, and put a tick in the exclusive column (the fourth one along). You can have as many exclusive shelves as you like.
If you want to make a shelf sortable (this allows you to change the order of the books on the shelf), select the box in the second column. To make a shelf sticky (meaning that it appears first on the list), select the box in the third column. To get recommendations based on the books on a shelf, select the box in the final column. These options are available for every shelf, exclusive or not. You probably don’t want recs on your DNF shelves – I’m not sure why I have them on mine!
This is also the page you set your feature shelf from. The feature shelf is the one displayed on your profile. You can only have one, so choose wisely. Currently, I’m using my ‘Read 2018’ shelf – I always use my yearly shelf:
![]()
Other common choices are ‘Favourites’, ‘Five Star Reads’, and even just the basic ‘Read’ shelf. To select your feature shelf, click the circle in the first column. It should end up looking like the one above.
Adding Books to Shelves
Now we’re going to add some books to your shelves. Far and away the easiest way to do this is to use the app, which allows you to scan books. This saves a lot of time because it finds your edition for you. However, we’re going to do it on the desktop.
The first step is to find a book you want to add to a shelf, any shelf. Next, find it through the search function:
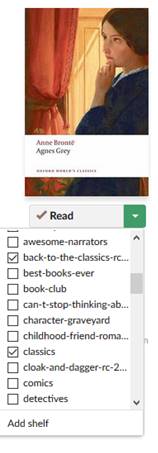
When the book’s page loads, you’ll see a green ‘Want to Read’ box beneath it. If you want to add it to that exclusive shelf, all you have to do is click on it. Otherwise, hover over the green arrow beside it to bring up a drop-down menu of your shelves. You can select one exclusive shelf and tick as many other shelves as you would like. You can also bulk-add books by going to ‘My Books’ in the navigation bar and selecting ‘Batch Edit’ beside the bookshelf search bar:

This brings up the batch edit menu pictured above. You can select books by clicking on them, select a shelf from the drop-down menu, and then hit ‘Add Books to this Shelf’.
Shelf Suggestions
The following are suggestions of shelves you may want to add:
- DNF (Exclusive)
- Reread
- Read in [year]
- Read for [reading challenge]
- Read for [Readathon]
- Reviewed
- Plan to Review
- Required Reading
- Non-Fiction
- Shelves for Specific Genres
- Shelves for Specific Authors
- Shelves for Specific Series
- Shelves for Specific Formats (i.e. Comics, Manga, Audiobooks, etc.)
- Star Rating Shelves
Now that you’ve got shelves and all the books in the right ones… It’s time to make friends!
Jen’s thoughts about making friends on Goodreads
Goodreads lets you look for friends that you may know through your Gmail account, Facebook, Twitter, Friends of Friends and you can also search by someone’s name or email. And while some of those options may be a great start for finding friends, when I started out years ago, that didn’t help me. I had not even a handful of friends through Facebook that used Goodreads. I wanted to find people who liked similar books and who would also introduce me to new books. So I had to go and find Goodreads people that I wanted to be friends with.
So how in the world did I find friends? I’m sure everyone has a different approach, but the one I took worked really well for me. I went by going to the pages of my favorite books. And if I 5-starred a book, then I’d look at those people who also 5-starred a book. Or I’d go to the pages of books I loathed and if I 1-starred a book, then I’d be looking for people who also 1-starred that book. Once I found those people, then I’d click on their profile and then click on the Compare Books Section (the link is under their About Me Section). And sometimes when I was comparing our books, I’d even click in the upper right hand section “Common Shelves – Read” so I could see how we rated the books we both had already read. If we were a good match, then I’d send off a friend request. Here’s what comparing books looks like with one of my book besties:
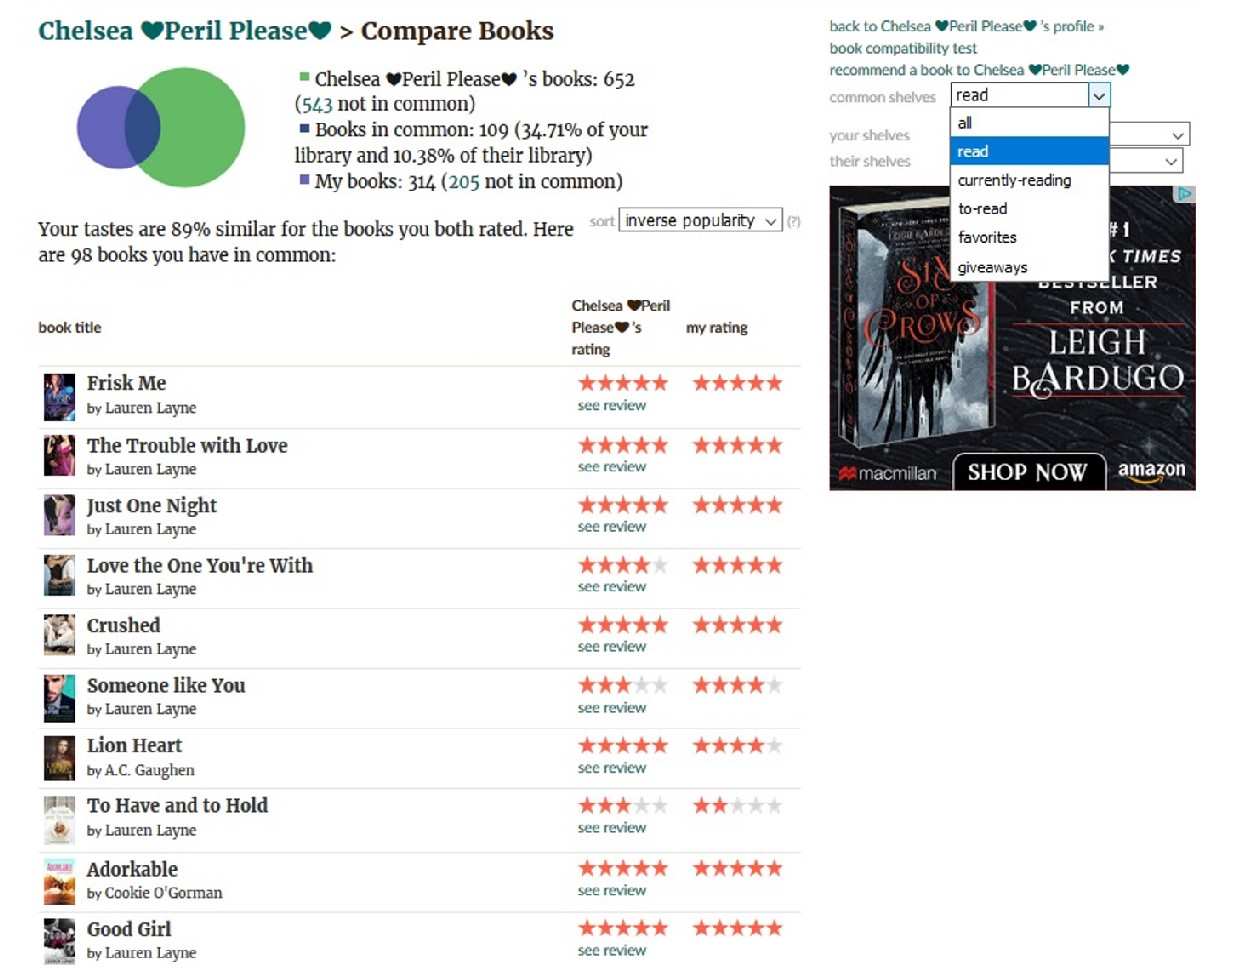
While this way may not be how you want to approach friends, I’m so grateful because that’s how I met my future co-blogger! We both loved a lot of the same books, started messaging on Goodreads, then started texting every day and then created a blog together.
Also, I have a random little helpful hint… when people write on your wall, don’t write them back on your own wall. They won’t get a notification. So make sure you go to their wall, on their page, and write your comment back there.
I will add another point from myself (Evelina here!) that another great way to find friends organically is to join groups. Perhaps we’ll have another post on Goodreads groups, because this post is getting long, but keep this option in mind! And for now, you can join our groups of bloggers struggling with a NetGalley, Edelweiss or other types of ARC addiction: #ARCsAnonymous! Now then, before we finish this post, another fun part of Goodreads remains to be explained… Aren’t all of us in the bookworm world all about lists?
Ivy helps us explore Listopia
Welcome to the magical world of Listopia! Here, you can find lists of books for everything from YA debuts coming out this year to diverse fantasy and sci-fi to books you disliked that everyone else seems to love. Anyone can create a list and, once created, anyone can add to a list. The more people who add the book, the more votes it gets, and the higher it ranks. Want a private list? That’s called a shelf, so shoo on back up to bookshelves. Go on. Get out of here. Party pooper.

So how do you get to this magical land, I hear you ask. Go up to the navigation bar and hover over the ‘Browse’ button to bring up the drop down menu.
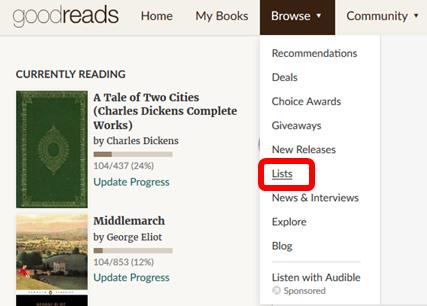
Click on ‘Lists’ and a handy portal will transport you to Listopia. If you scroll down the main Listopia page, you’ll see a number of headings. At the top are Featured Lists, below them are Lists with Recent Activity, then there are Lists Your Friends Have Voted on, and finally Popular Lists at the bottom. The sidebar shows the ‘Best of’ Lists (Best Books Ever, Best Books of 2018, etc. – it’s all opinion, of course, so take it with a pinch of salt), the most popular list tags (and a search box so you can find less popular tags), and the most recently created lists. At the top right of the page, you should see the following links:

They’re pretty self-explanatory. Now, let’s have a go at creating a list. Click on ‘Create New List’:
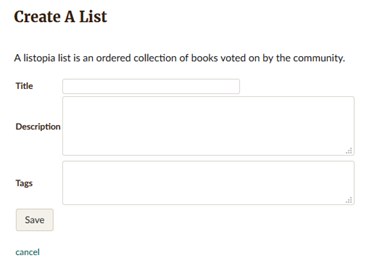
Type the name of the list into the title box. Once you click out of said box, Goodreads will bring up a number of lists which may or may not be the same. The idea is to prevent the creation of one hundred ‘Best Fantasy Novels’ lists or seventy ‘Wish I’d Never Read’ lists. If there’s already a list, don’t make a new one. Eventually, Goodreads would just merge them anyway.
In the description box, explain what the list is about. Here, people sometimes choose to list rules. A common rule is that only the first book of a series should be added to the list. Then tag the list with anything related to it and hit save.
How to Add a Book to a List
The easiest way to vote for a book is to find it on the list and simply hit the ‘Vote for this Book’ button beneath the title:

If the book isn’t already on the list, you need to click on ‘Add Books to this List’, which you will find on the top right, just next to the sidebar. This will bring up the following menu:
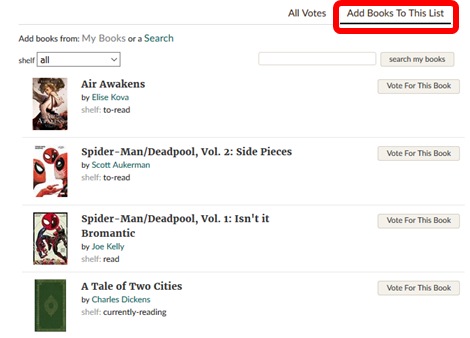
As you can see, the search box is automatically set up for books found on your shelves. You can switch it to a general search by hitting the green ‘Search’ in the top left of the screenshot. That will also cause the books below it – the books you’ve added most recently – to disappear from the page. Once you’ve found the book you want to add, you click the ‘Vote for this Book’ button to the right of the title.
And this seems to be all for the goodreads tutorial!
Although we teach basic stuff here in this post, I hope you have found something useful here! And if you know someone who’s new to Goodreads, point them here to read up on it. As for the social medias posts, there will be beginner (and not so beginner!) posts about a lot of social medias, to stay tuned!
Are you very active on Goodreads? What’s your favorite part of this social network? Do you have a lot of friends and followers on Goodreads? Or maybe there’s still someone you want to ask about Goodreads?
I’m Evelina and I blog about books that made an impression on me. I love middle grade, women’s, scifi and some literary too.
